
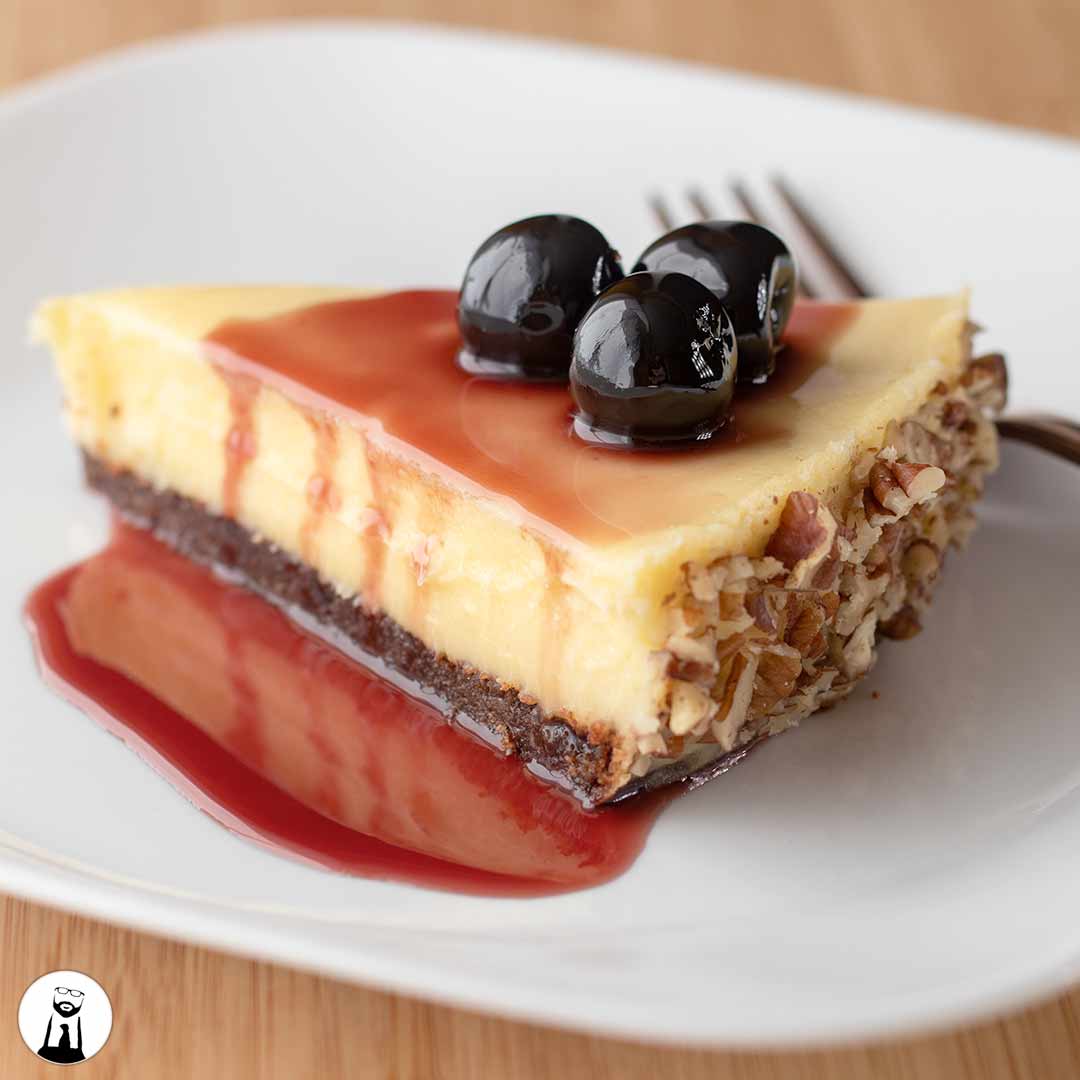
There’s nothing more decadent that a super creamy cheesecake. However, if you’re looking for a NY style cheesecake, this is NOT it, but I implore you to try this recipe. It’s super smooth and creamy with just the right amount of sweetness and a tinge of tartness.
The best part about this recipe is: I guarantee that no one will ever know it’s low-carb and keto friendly. My parents tried it, my grandfather tried it, and they all raved about it – something they rarely do. So if you have a dinner party or a cookout coming, I highly recommend it. It will allow you to have seconds and keep in line with your diet while not having to tell anyone or make excuses for not having certain dishes. Even though you shouldn’t care what other people think or say, we’ve all had to go through the same questions over and over and sometimes… you just want a piece of damned cheesecake.
It will take some time to cook – sure, but it will be worth it. I guarantee people will talk about ‘that cheesecake you made was soooo good! How come you haven’t made it again?!’ They’ll keep asking for the custard for years to come, guaranteed.

Wait cheesecake is not a… cake?
Correct. Cheesecake is not actually a cake… and doesn’t even have cheese (I don’t really quality cream cheese as a cheese, but that’s my uneducated opinion). But how does cheesecake qualify as a custard? First off, there’s no flour – and you’re not making a batter. It’s a base of eggs, milk fat, and sugar – just like a flan or creme brulee. This is why we cook the cheesecake in a water bath instead of a spring form pan – because it’s a custard.
How important is it to have the ingredients at room temperature?
It is ABSOLUTELY CRUCIAL! This is not a joke. In the recipe I suggest leaving everything out for at least 6 hours. Personally, I leave my ingredients on the counter the night before.
BUT WHY?!?!?
If you’ve never worked with cream cheese, it is incredibly difficult to work with when cold. Just think about the times you tried to put cream cheese on a bagel and how it stuck to the knife like a blood sucking leech – THAT is what you’re working with. It will form into tiny beads that simply won’t smooth out. But, if you let it warm up, it becomes super soft and malleable: exactly what we need.
Is Cream Cheese Keto Friendly?
Yes, yes it is! Some varieties will have about a carb per serving, but there are some brands (typically the organic ones) that are carb free. Other than that, cream cheese is basically milk fat and protein
Can you substitute the almond flour?
You likely could, but coconut flour is a huge moisture suck and might lead to a very dry crust. If you do, I would up the butter by about a tablespoon or until the batter is moist.
Are those cherries Low-Carb/Keto?
Not even close. I can’t read Italian, but I can still read numbers and they aren’t low. However, you’re not eating the entire bottle (it takes a little restraint, but not much), but 1 cherry with a little cherry juice is worth it in my book. Whether it’s cheesecake or cocktails, I love these Luxardo Cherries.

Keto Cheesecake
This Low-Carb and Keto friendly cheesecake is SUPER silky smooth - it reminds me more of key lime pie than it does cheesecake! It's super simple to make, but it does require some attention to detail! Did I mention how delicious it is?
Ingredients
Crust
- 125g almond flour
- 40g allulose
- 4 tbsp (57g) unsalted butter
- 3 tsp (8g) cocoa powder
- 1 tsp (2.5g) cinnamon powder
- 1 tsp (2.5g) kosher salt
Filling
- 20 oz cream cheese (2.5 blocks)
- 1 ⅓ cups (10.25 oz) sour cream
- 1 cup Allulose
- 1 tsp vanilla extract
- 2 large eggs
- 3 large egg yolks
HARDWARE
Instructions
Crust
- Preheat the oven to 350°F/176°C.
- Line the 9” pan with parchment paper, using butter as glue. Cut a circle for the base and a long strip for the side walls (see video for guide).
- Melt the 4 tbsp of butter. You can cut the butter into pieces, place in oven safe bowl, and melt in the preheating oven.
- In a bowl, mix the almond flour, allulose, cocoa powder, cinnamon powder, and kosher salt until well combined.
- Add the melted butter and mix until well combined - it should look like wet brown sand.
- Pour the crust mixture into the line pan and spread out across the bottom with a fork. Then gently begin to press it into the pan. Once you have a decent layer, use a flat surface such as a measuring cup to press the crust firmly, but careful not to strong arm it or you will have the crust stick to the measuring cup.
- Place the pan into the oven for 10 minutes.
- Remove and let cool to room temperature (about 10 minutes).
- Do not add the filling to the crust if it is not at least room temperature! You can also place it into the fridge to help solidify the crust before adding the filling.
Filling
- All the filling ingredients MUST be room temperature before you start. Leave them on the counter for at least 6 hours - personally, I like to take the ingredients out the night before. Leave the cream cheese, the sour cream, and the eggs to get to temperature.
- Preheat the oven to 250°F/12°C.
- Start heating some water in a kettle or in a pot. You will need about a quart of water.
- In a stand mixer add the 20 oz of cream cheese and beat using a paddle attachment. You could use a hand mixer, but you will be there all day - and don’t even think about doing this by hand unless you have hours and calories to burn. Bring the mixer up to medium speed
- Once the cream cheese has become silky smooth, add the sour cream and continue mixing until smooth once again.
- After a few minutes, stop the mixer and scrape the bowl to ensure no cream cheese or sour cream has stuck to the sides or bottom.
- In a separate bowl, separate out the eggs. You want two whole eggs and 3 egg yolks. To separate the egg yolks, crack them over a separate bowl in case the yolk cracks. Then add the yolk to the main bowl.
- Once the cream cheese mixture is smooth, add the cup of allulose sweetener. Start the mixer on low to prevent throwing sugar all over your kitchen, then bring it up to a medium pace until it’s completely incorporated.
- Once the sugar is dissolved, add a teaspoon of vanilla extract to the cream cheese.
- Add one egg at a time until it is completely incorporated. After adding two eggs, stop the mixer and scrape the bowl with a spatula, making sure to scrape anything off the sides and bottom.
- Continue adding the eggs until combined, then stop mixing. If you over mix, the potential exists to have an undesirably liquid cheesecake.
- Pour the filling into the pan with the baking crust.
- Stamp out any air bubbles in the filling by gently dropping the pan from an inch or two off the counter. Continue until you see no more air bubbles coming to the surface or until you decide you don't care anymore and the bubbles can stay.
- Place a small dish towel flat in the larger pan and place the pan into the oven. Then place the pan with the cheesecake inside. This is the base for our water bath - the towel is not necessary, but it helps prevent splashing and sliding of the cheesecake.
- Add the hot water to the outer pan, to about ⅔ of the way up the cheesecake pan.
- Close the oven and set a timer for one hour.
- After the hour is up, turn the oven OFF and crack the door of the oven for one minute to let heat escape. Do NOT open the door completely or it will crack the cheesecake.
- Shut the oven door and set a timer for another 1 hour. The oven is OFF at this point - we simply want to bring the cheesecake time to cool slowly!
- Once the timer finishes, remove the cheesecake and let cool to room temperature. This should take roughly 2 to 3 hours.
- If the cheesecake is cool to the touch, place into the refrigerator for at least 6 hours.
Notes
- To serve, cut across the entire cheesecake with a long knife if you have one. So, cut it into 1 half, then cut across the other half to create 4 quarters, etc. When you slice, cut down, and slide out while in the crust. Clean the knife between slices for perfectly pretty cuts!
- I cannot stress enough how CRITICAL it is to have your ingredients at room temperature.
- You can use a smaller cake pan, such as a 7 inch and go taller (say 3") for a 'not so shallow' cheesecake.
- The net carb count CAN be made lower. The nutritional facts were generated with regular cream cheese which has roughly 1 carb per serving. You can find cream cheese with a carb count below 1
Recommended Products
As an Amazon Associate and member of other affiliate programs, I earn from qualifying purchases at NO cost to you! This helps keep the lights on, the site running, and the videos coming!


Nutrition Information
Yield 8 Serving Size 1 sliceAmount Per Serving Calories 519Total Fat 48gSaturated Fat 26gCarbohydrates 23gNet Carbohydrates 8gFiber 15gSugar 8gProtein 11g
The sugar count is at 8g because it also includes the use of Allulose as a 'sugar' - even though it isnt metabolized by the body. BUT since it isnt considered fiber, it IS counted as a sugar. If you remove the allulose, each slice is around 1-2g net carbs!
What a guy…Love you and your channel!!!
Thanks Deborah!
Make it easier to serve by using a spring form pan. You can still use the water bath – just mold heavy-duty foil over the bottom and sides of the pan to prevent any leaks. I’ve got mine in the oven at the moment…😁
How’d it turn out?! I’ve never had luck with springform pans – even wrapping it with so much foil, etc… I think I’m just bad at it!
Dennis, first of all, thanks for the recipe, I’ve tried another Keto cheesecake and it didn’t turn out so well, but I ain’t giving up. My question, if you didn’t have allulose what sweetener would you use (assuming another gives a satisfactory result)? It’s impossible to get allulose in the UK (cos Europe) though I did manage to get one small pack last year and realised this stuff is fantastic.
Erythritol can work, but it has a chance of that ‘sandy’ sensation!